I have been reading the medieval Japanese-inspired novel series by Lian Hearn, the Tales of the Otori on Calibre eBook viewer. But I don't care much for the existing covers I can find on Google. They're too ... elaborate for my tastes:

I needed to make my own eBook cover for Across The Nightingale Floor. My idea was to have a single emblem—the heron kamon (family crest) of the Otori as the main decoration on the book cover and graphic accents on the virtual "spine" (changeable to other crests and color motifs relevant to the story for the remaining books). But first, I had to find a heron kamon. The Japanese word for "heron" is "sagi".
I googled for "heron crest" or "heron kamon" or "sagi kamon", hoping to find a suitable and authentic emblem to include in the cover. I found one, a triple-heron done in the paulownia (kiri) leaf style:

I wanted the round look of the crane crests like the one seen on Japan Airlines. I found plenty of cranes but I found none similar for herons. I would have to make my own.

Here’s my version of the Otori sagi kamon (and eBook cover):

I stylized the emblem based on my google-obtained references of herons and how they look in Japanese art:

That’s when I noticed that a heron’s neck is not a smooth s-shape, but has a distinct khopesh-like crook.

It was only after I made the kamon, when I googled "otori crest", that I found one at author Lian Hearn’s website. It is one of six (the other five are other clans in the series):

I'm thankful I only found this later, as I think my version has a more Japanese feel to it. :) Here’s how I drew it in Inkscape:


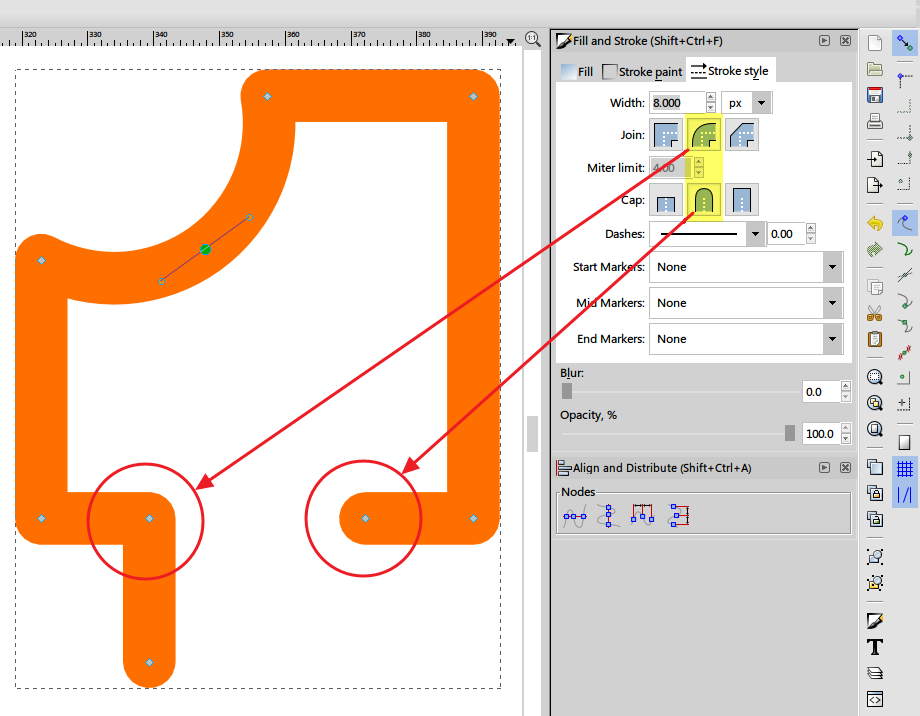
I just used these lines to shape the bigger "feathers" – I didn't have time for making the smaller ones. See this pic for stroke settings:


However what I don't like about this method is it's destructive—it removes the divider lines—leaving the cutout shapes hard to edit (what if I want to make fine tuning later?).
In keeping with the quick and dirty theme of this tutorial, the bucket fill tool (Shift+F7) is a good alternative as it allows me to click on any portion and, as long as it's differently colored from its surroundings, it will be traced quickly. You may have to zoom in (+) on the portion to be traced to make a better trace. The resulting traced shapes are not perfect—I like the wabi-sabi imperfection—but they gain character in the process. You can group (CTRL+G) or combine (CTRL+K) the traces later to make the whole design. And you can edit the underlying scaffolding at any time without losing the clone.

Fortunately, there's a workaround. It could take some time (if you're doing a complicated graphic) but rounding out sharp outward and inward facing corners is easily achieved by applying a rounded join stroke on the shape (2x the width of the desired rounding radius), converting that stroke to a shape, breaking the resulting shape apart, applying another rounded join stroke to the broken pieces, converting strokes to shapes again, breaking the shapes apart again, and removing the outermost and innermost shapes, then doing a division process (CTRL+/) on the remainder. (Watch this video to see how it's done.) [2023 Update: if you use the "Corners (Fillet/Chamfer)" live path effects in newer Inkscape versions, you might need to tweak the individual rounded corners with the node tool because this live path effect can result in corner radiuses that vary widely in size, unlike the long method.]

Then we end up at last with:

I'm still not satisfied with the bottom part, but I don't have time to refine it now. Enjoy drawing with Inkscape. :)
###
I needed to make my own eBook cover for Across The Nightingale Floor. My idea was to have a single emblem—the heron kamon (family crest) of the Otori as the main decoration on the book cover and graphic accents on the virtual "spine" (changeable to other crests and color motifs relevant to the story for the remaining books). But first, I had to find a heron kamon. The Japanese word for "heron" is "sagi".
I googled for "heron crest" or "heron kamon" or "sagi kamon", hoping to find a suitable and authentic emblem to include in the cover. I found one, a triple-heron done in the paulownia (kiri) leaf style:
I wanted the round look of the crane crests like the one seen on Japan Airlines. I found plenty of cranes but I found none similar for herons. I would have to make my own.
Here’s my version of the Otori sagi kamon (and eBook cover):
I stylized the emblem based on my google-obtained references of herons and how they look in Japanese art:
That’s when I noticed that a heron’s neck is not a smooth s-shape, but has a distinct khopesh-like crook.

It was only after I made the kamon, when I googled "otori crest", that I found one at author Lian Hearn’s website. It is one of six (the other five are other clans in the series):

I'm thankful I only found this later, as I think my version has a more Japanese feel to it. :) Here’s how I drew it in Inkscape:
Step 1. Arrange visual references and guides
This is just a quick and dirty project so I just resorted to tracing and ad lib. First, I composed my references, adding circular guides (based on Golden Ratio proportions because I am lazy):Step 2. Block in the shapes
Then, using the Bezier pen tool (Spiro mode), I blocked in the major shapes. The heron's head crest is a separate shape, so I can better control the curves. The left and right sides are kept identical through the good old cloning and mirroring technique.Step 3. Add detailing
Then I added the dividers. To keep the distance between the resulting elements equal, I just used thick curved lines that have rounded ends and rounded corners (still Bezier pen, Spiro mode):I just used these lines to shape the bigger "feathers" – I didn't have time for making the smaller ones. See this pic for stroke settings:
Step 4. Cut it out
Once the dividers are made, the usual thing to do is to unclone the clone, ungroup the dividers from the major shapes, weld the major shapes (CTRL++), combine the orange dividers (CTRL+K), place the resulting path over the major shapes, convert the divider strokes to paths (CTRL+Alt+C), then use the resulting divider path to do a difference operation (CTRL+-) over the major shape path. The process is like using a cookie cutter to cut out portions out of the plain bird shape. This results in a crisp illustration, bringing out the "feathers", with a minimum of nodes.However what I don't like about this method is it's destructive—it removes the divider lines—leaving the cutout shapes hard to edit (what if I want to make fine tuning later?).
In keeping with the quick and dirty theme of this tutorial, the bucket fill tool (Shift+F7) is a good alternative as it allows me to click on any portion and, as long as it's differently colored from its surroundings, it will be traced quickly. You may have to zoom in (+) on the portion to be traced to make a better trace. The resulting traced shapes are not perfect—I like the wabi-sabi imperfection—but they gain character in the process. You can group (CTRL+G) or combine (CTRL+K) the traces later to make the whole design. And you can edit the underlying scaffolding at any time without losing the clone.
Step 5. Soften sharp corners
The last step is to round out the sharp corners of the trace so it will look better (and the "feathers" would look more "feathery"). In CAD programs, this is done through a chamfer/fillet function. However, it seems the newest stable release of Inkscape (version 0.92) doesn't have a fillet/chamfer tool yet (it was available as a path effect in the developer version as early as 2015).Fortunately, there's a workaround. It could take some time (if you're doing a complicated graphic) but rounding out sharp outward and inward facing corners is easily achieved by applying a rounded join stroke on the shape (2x the width of the desired rounding radius), converting that stroke to a shape, breaking the resulting shape apart, applying another rounded join stroke to the broken pieces, converting strokes to shapes again, breaking the shapes apart again, and removing the outermost and innermost shapes, then doing a division process (CTRL+/) on the remainder. (Watch this video to see how it's done.) [2023 Update: if you use the "Corners (Fillet/Chamfer)" live path effects in newer Inkscape versions, you might need to tweak the individual rounded corners with the node tool because this live path effect can result in corner radiuses that vary widely in size, unlike the long method.]

Then we end up at last with:
I'm still not satisfied with the bottom part, but I don't have time to refine it now. Enjoy drawing with Inkscape. :)
###
Comments