[Note: This was originally posted as a Facebook Note on December 24, 2014 at 12:44pm. I lost several images on old tutorials in the Facebook Note format – maybe because images get moved around. I'm recreating them here. Although the software examples are outdated, the principles used can still apply with newer software.]
“Maayo” is the first half of the Cebuano Bisaya greeting of “Maayo’ng Pasko”, literally “Good Christmas” but some of you might prefer Happy Hanukkah, Diwali, Eid al-Adha or a simple well-wishing so I kept it open-ended. “Maayo” – good, happy, best, something something – as long as it makes you well. The “birds” are the Baybayin syllable characters for Ma+A+Yo. The Baybayin was supposed to be generic calligraphic pen writing (I think I’ll get a cheap graphics tablet next year) but then I noticed they look like birds so I ended up with bird forms.


 Use the Ellipse tool (F5) to make the circular shapes ('eyes' and the kudlit).


“Maayo” is the first half of the Cebuano Bisaya greeting of “Maayo’ng Pasko”, literally “Good Christmas” but some of you might prefer Happy Hanukkah, Diwali, Eid al-Adha or a simple well-wishing so I kept it open-ended. “Maayo” – good, happy, best, something something – as long as it makes you well. The “birds” are the Baybayin syllable characters for Ma+A+Yo. The Baybayin was supposed to be generic calligraphic pen writing (I think I’ll get a cheap graphics tablet next year) but then I noticed they look like birds so I ended up with bird forms.
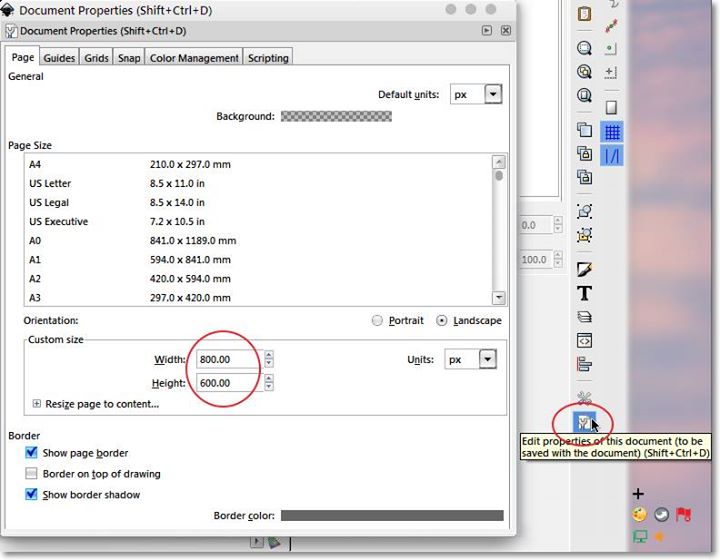
Step 1: Set up page
When you fire up Inkscape, the default document size is US Letter Size. I decided to go for da good old (svga) 800 x 600 pixels (at my monitor’s resolution). Click the Document Properties icon (CTRL+SHIFT+D) to set up your page.Step 2: Lettering
Create the Baybayin calligraphic lettering using the Calligraphic Pen tool (CTRL+F6).
I used these calligraphic pen settings (click on the image to enlarge):
Make sure the fill rule is nonzero so the letterings won't be white where they intersect (it's unsightly that way):
Step 3: Shapes
Trace the Baybayin characters using the Bezier pen tool, select the Spiro mode. The Spiro feature is a way of making it difficult for you to make an ugly curve (even mistakes can be pretty). It is based on the calculus of variations, the math of computing optimal aircraft trajectories (literally rocket science) and the Spiro code itself was programmed by Raph Levien. Inkscape and the free font creator Fontforge has it, but I don't know of any commercial software (Adobe Illustrator, Adobe Photoshop, CorelDraw or Xara Designer) that has it already.
Step 4: Fill
Fill the traced shapes with color (select a shape, left click on any of the color swatches on the color palette near the bottom), then create a linear color gradient (use the gradient tool, drag over the still-selected filled shape then select a second color from the color palette (near the bottom of the Inkscape window).
The gradient on the circle kudlit at the bottom of the 'Yo' character is a radial gradient.
I finished out by filling the 'eyes' with black and then selecting all the finished shapes and removing the outline by right clicking on the 'x' swatch on the color palette.
Step 5: Create backdrop
I arranged the shapes and then did the background on another layer (CTRL+SHIFT+L to create a layer, make sure new layer position is 'below current' for the backdrop – there are directional arrows for moving layers on the layers panel if you miss this step).
I created the backdrop panel (same size as the page) using the rectangle tool, colored it with a dark blue to black gradient and centered it on the page (CTRL+SHIFT+A).
Step 6: Star stream
For the 'stars', I created a white circle with no outline, clicked the radial gradient to make it look blurred, duplicated it and resized the duplicate down proportionally dragging the corner resize tool and CTRL+SHIFT. If you checked the little lock tool on top of the Inkscape window, you need only to do SHIFT+drag the corner tool to resize the little circle to the center.
I grouped the circles for my 'star' (CTRL+G) and further reduced it small enough to my liking. Next, I selected the star, then clicked on the green "Clone Spray" tool (SHIFT+F3) and dragged it across my backdrop panel. Note the spray clone settings on top (Width=15, Amount=70, Rotation=0, Scale=52, Scatter=70, Focus=0 [you may want your own settings]). It took me a few tries to get it looking right.
Step 7: Text
For the text, I used a thin font ('typeface' for typography purists) with a circular capital 'O' (Code Light). I sized and positioned the text so that the "O" is centered on the "Yo" kudlit.
Step 8: Export
Finally I exported the whole page as PNG (there's no other export format). The default resolution is standard screen resolution of 90 dots per inch (dpi) so it's OK for most computers . For Apple Retina and UHD monitor users, increase this value to match your monitor's dpi values.
Facebook seems to convert PNGs to a sucky JPEG (particularly for blues and reds) as you upload (even fine-looking JPEGs get degraded when uploaded). Here is the PNG in its original quality uploaded to Google+:
###
The online Word 2 HTML converter lets you transform Word documents to a clean code with just a few clicks.
Comments