[This was originally posted as a Facebook Note on Feb 23, 2010. I lost several images on old tutorials in the Facebook Note format – maybe because images get moved around. I'm recreating them here. Although the software examples are outdated, the principles used can still apply with newer software.]
In 2006, a friend asked me how to achieve this photo effect without using a dedicated photo-editor (eg Photoshop):

Here's how:
If you have a Linux distro installed, look for the XaraLX package (drawing package like Adobe Illustrator or Corel Draw but open source like Inkscape). If you don't, download the trial version of Xara Xtreme http://www.xara.com/us/ —trial but more advanced than XaraLX).
Here's the finished version:

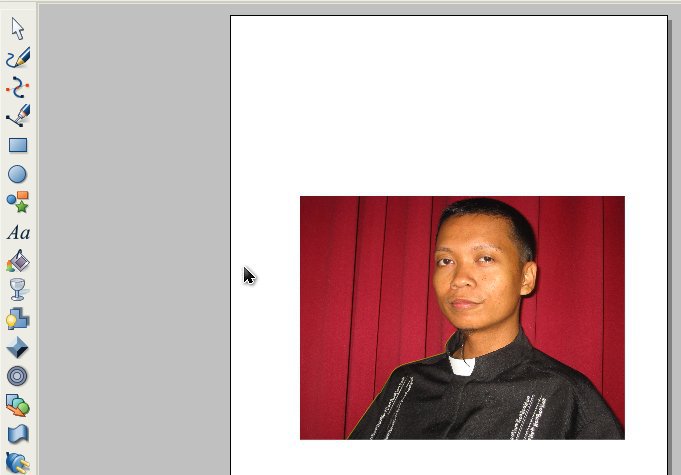
we will trace it using pen tool (Shift-F5)

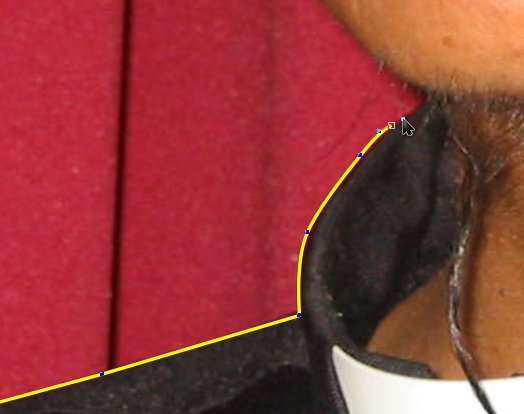
Here's a closer look on how to trace (i set the outline/stroke to yellow so you can see it better):
Result: Once the trace is completed around the figure and the path automatically closes, it will be filled with black.
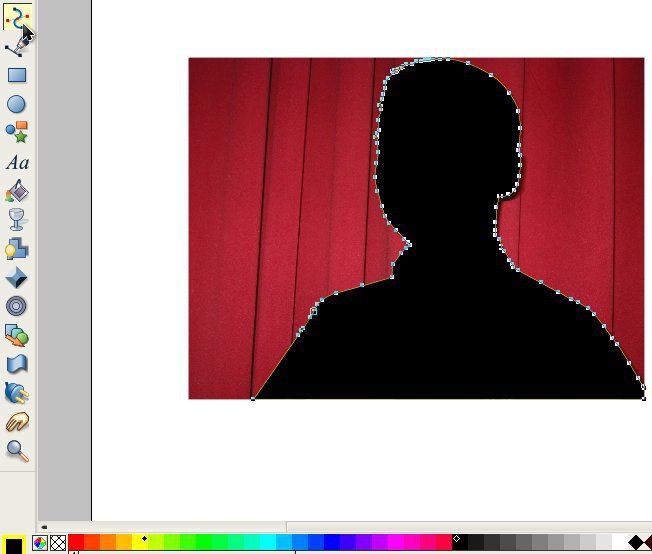
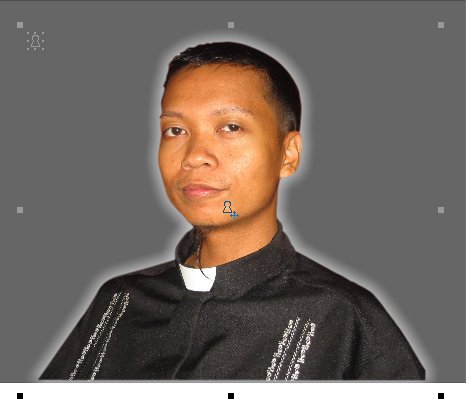
You can remove the black fill by left clicking on the mesh icon (2nd from leftmost of the color palette, beside the color-wheel icon).
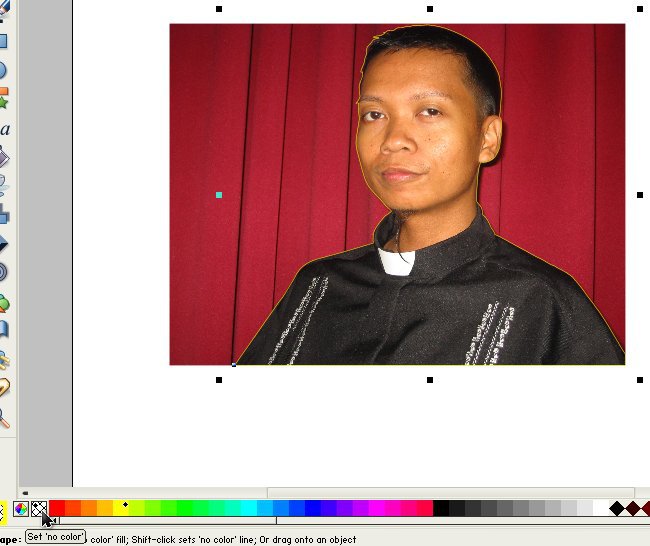
Send the tracing to back (Ctrl-B). Then, with the tracing still selected (you'll see the control boxes even if the selection is at the back), shift+left click on the picture to select both picture and tracing. Then go to menu: Arrange>Apply Clipview. Here's the result:

You can remove the yellow outline (shift+left click on the mesh icon ["set no color"] on the color palette while the clip group is selected).
You can also give it some feathering using the feather slider:

Give it a glow shadow (select shadow and click on any color—white or light yellow; around 30pixels shadow blur + 3pix feathering ):

Result:
Choose a font belonging to the Mistral family (Minstrel, Staccato, etc.). Type your text, click on a red palette color to color it red and then click on the fill tool (we will be giving the text a gradient fill):

With the fill tool still selected, drag your cursor down (or up) your text. Result: a vertical linear gradient (we will be modifying this).

Still see the gradient arrow? Double click on its middle (to add another color on it) then click a yellow fill from the palette menu. Result:

Then, click on the starting point (single click) and click on a red fill from the palette menu:

There! Don't forget the bevel: Drag towards the center with da bevel tool:

Result:

Let's adjust it because we want a soft effect:

Result:

You can give it a shadow (gray in this case):

Result:


The background collage is just pictures adjusted with feathering and arranged. Then I placed a rectangle with a circular gradient (recall how we did the gradient) fill (I just approximated the gradient on the model pic) over them. Add stained glass transparency to the rectangle (use the 'goblet' icon for that).

The clipped main picture should be placed in front with the beveled text.
Ahuh. Lazy Man's Photoshop. (Of course, you can also do this in other vector graphics software like #Inkscape, #CorelDraw, or #Illustrator.)
(I'd like to thank Father Remigio P. Mollaneda for lending his clerical costume to da old media development center where I used to ... hang out from 2004-2007 hehe.)
###
In 2006, a friend asked me how to achieve this photo effect without using a dedicated photo-editor (eg Photoshop):

Here's how:
If you have a Linux distro installed, look for the XaraLX package (drawing package like Adobe Illustrator or Corel Draw but open source like Inkscape). If you don't, download the trial version of Xara Xtreme http://www.xara.com/us/ —trial but more advanced than XaraLX).
Here's the finished version:

STEP 1. Obtain a suitable picture
(I was lucky an oversized priest uniform was lying around heheh).

Here's a closer look on how to trace (i set the outline/stroke to yellow so you can see it better):

Result: Once the trace is completed around the figure and the path automatically closes, it will be filled with black.

You can remove the black fill by left clicking on the mesh icon (2nd from leftmost of the color palette, beside the color-wheel icon).

Send the tracing to back (Ctrl-B). Then, with the tracing still selected (you'll see the control boxes even if the selection is at the back), shift+left click on the picture to select both picture and tracing. Then go to menu: Arrange>Apply Clipview. Here's the result:

You can remove the yellow outline (shift+left click on the mesh icon ["set no color"] on the color palette while the clip group is selected).
You can also give it some feathering using the feather slider:

Give it a glow shadow (select shadow and click on any color—white or light yellow; around 30pixels shadow blur + 3pix feathering ):

Result:

STEP 2: The "Word Art" effect:
Choose a font belonging to the Mistral family (Minstrel, Staccato, etc.). Type your text, click on a red palette color to color it red and then click on the fill tool (we will be giving the text a gradient fill):
With the fill tool still selected, drag your cursor down (or up) your text. Result: a vertical linear gradient (we will be modifying this).

Still see the gradient arrow? Double click on its middle (to add another color on it) then click a yellow fill from the palette menu. Result:

Then, click on the starting point (single click) and click on a red fill from the palette menu:

There! Don't forget the bevel: Drag towards the center with da bevel tool:

Result:

Let's adjust it because we want a soft effect:

Result:

You can give it a shadow (gray in this case):

Result:

Da complete exercise:

The background collage is just pictures adjusted with feathering and arranged. Then I placed a rectangle with a circular gradient (recall how we did the gradient) fill (I just approximated the gradient on the model pic) over them. Add stained glass transparency to the rectangle (use the 'goblet' icon for that).

The clipped main picture should be placed in front with the beveled text.
Ahuh. Lazy Man's Photoshop. (Of course, you can also do this in other vector graphics software like #Inkscape, #CorelDraw, or #Illustrator.)
(I'd like to thank Father Remigio P. Mollaneda for lending his clerical costume to da old media development center where I used to ... hang out from 2004-2007 hehe.)
###
Comments